Best Camp Stove Reviews – Why you Need a Camp Stove: Tips and Recipes

This post is meant to provide information to Soldiers, campers, or backpackers who are seeking more information about a new phenomenon I have been seeing in the ranks: the camp stove.
Long gone are the days of instant cold coffee and MREs, now the era of hot, fresh French-pressed coffee, instant noodles, and the ever morale-boosting hot shave has finally come to pass.
This post will explain why you need a camp stove and its uses in the field. I will describe how to get a hot shave, prepare a perfect cup of joe, give you recipes used in the field, and review the popular choices I see most often (Spoiler Alert: Jet Boil, Biotite Camp Stove 2, and the AeroPress OWN the market).
What is a camp stove and do I have room in my rucksack for one?
The camp stove is not a new invention. The first ones came out in the early 1940s as a means for G.I.s to heat their rations and food without the need for cooks to be forward of the frontlines. Times have changed my friend, now the pocket stoves can easily be jettisoned into a pocket or rucksack providing instant heat for chow, or dozens of other uses which I will soon explain.
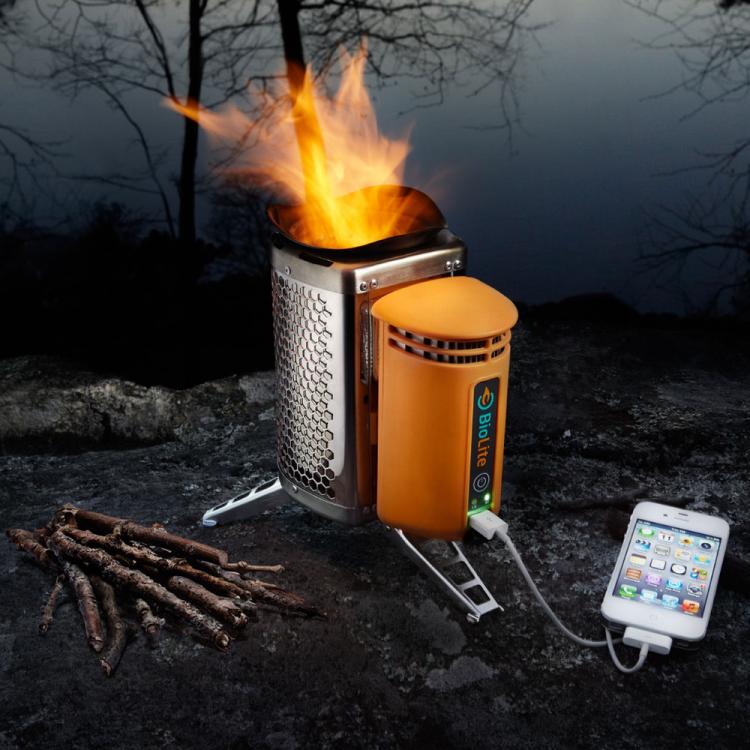
Wood / BioFuel Stoves: These stoves can burn twigs or wood pellets
Canister Stoves: Use small canisters of propane / isobutane mix
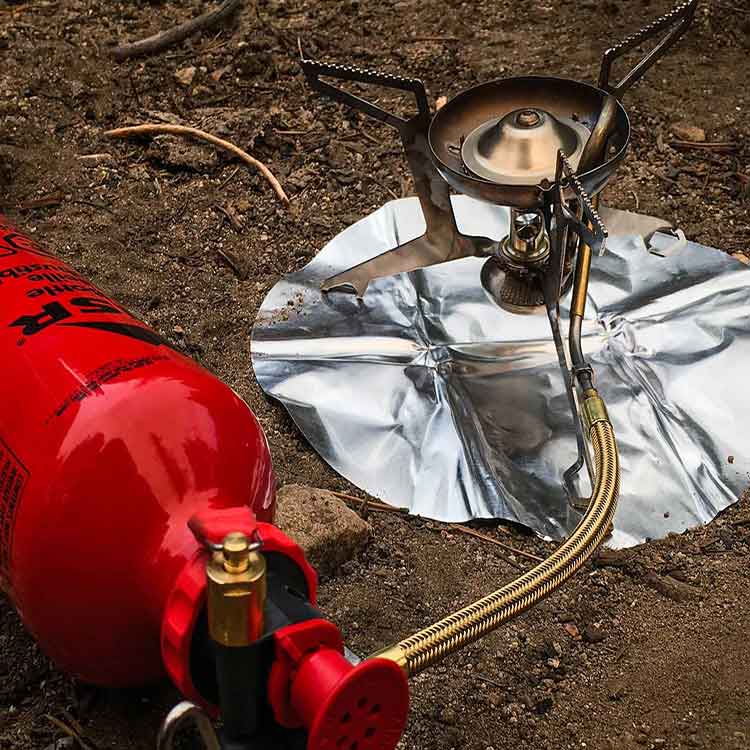
Liquid Fueled Stoves: Use “white” liquid fuel such as Coleman fuel
Camp Stove Reviews: A Soldier’s Perspective on the Jet Boil Flash vs Biolite Camp Stove 2 vs the MSR Pocket Rocket 2
Of the five main types of stoves available I normally see only three different stoves: the Jet Boil, MSR Pocket Rocket, or the Biolite Camp Stove 2. The Solid Alcohol stoves and liquid alcohol stoves are just too slow and require very flammable fuel to be kept in your rucksack. You can imagine the mess that a plastic bottle of HEET that has burst in your bag could make. The solid alcohol esbit tabs just burn about 12 minutes each and take quite a while to heat up a canteen cup of water.
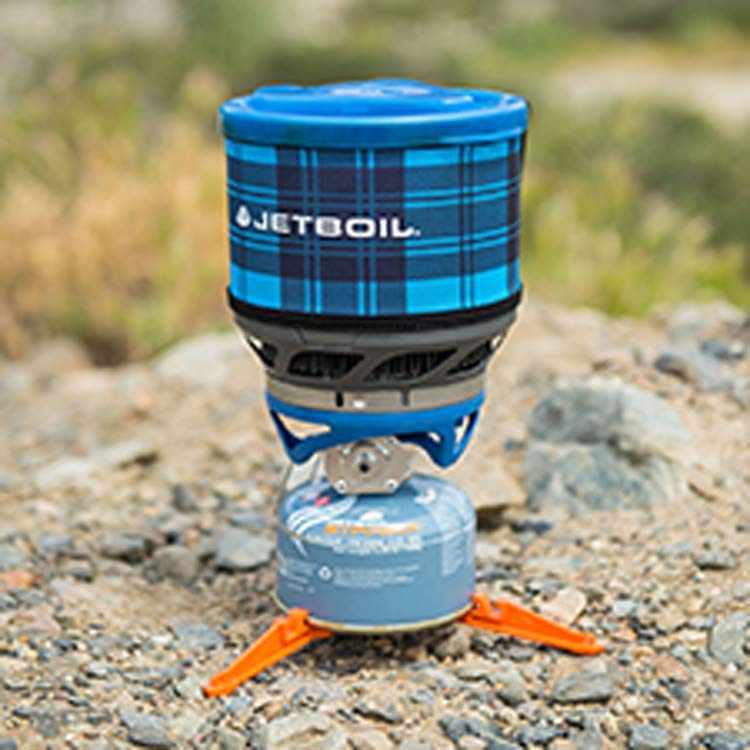
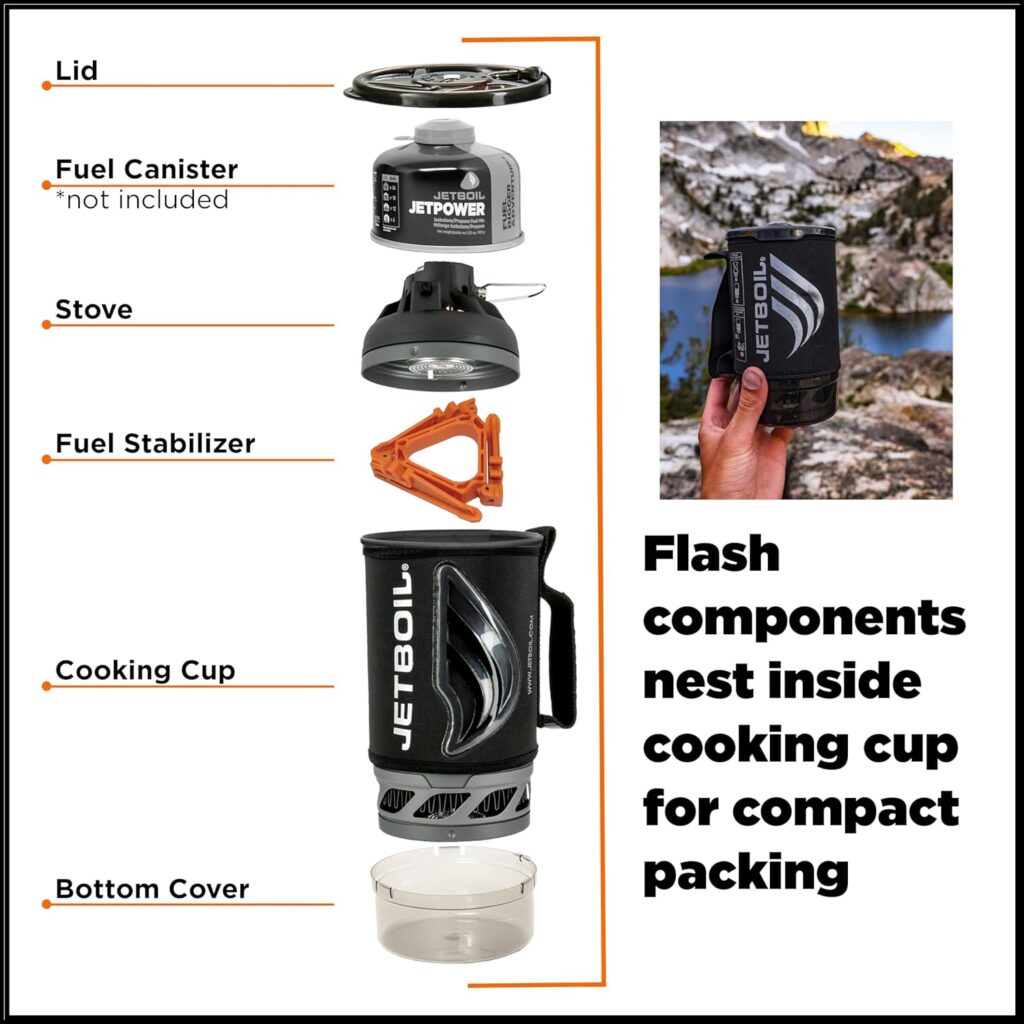
Jetboil Flash Cooking System
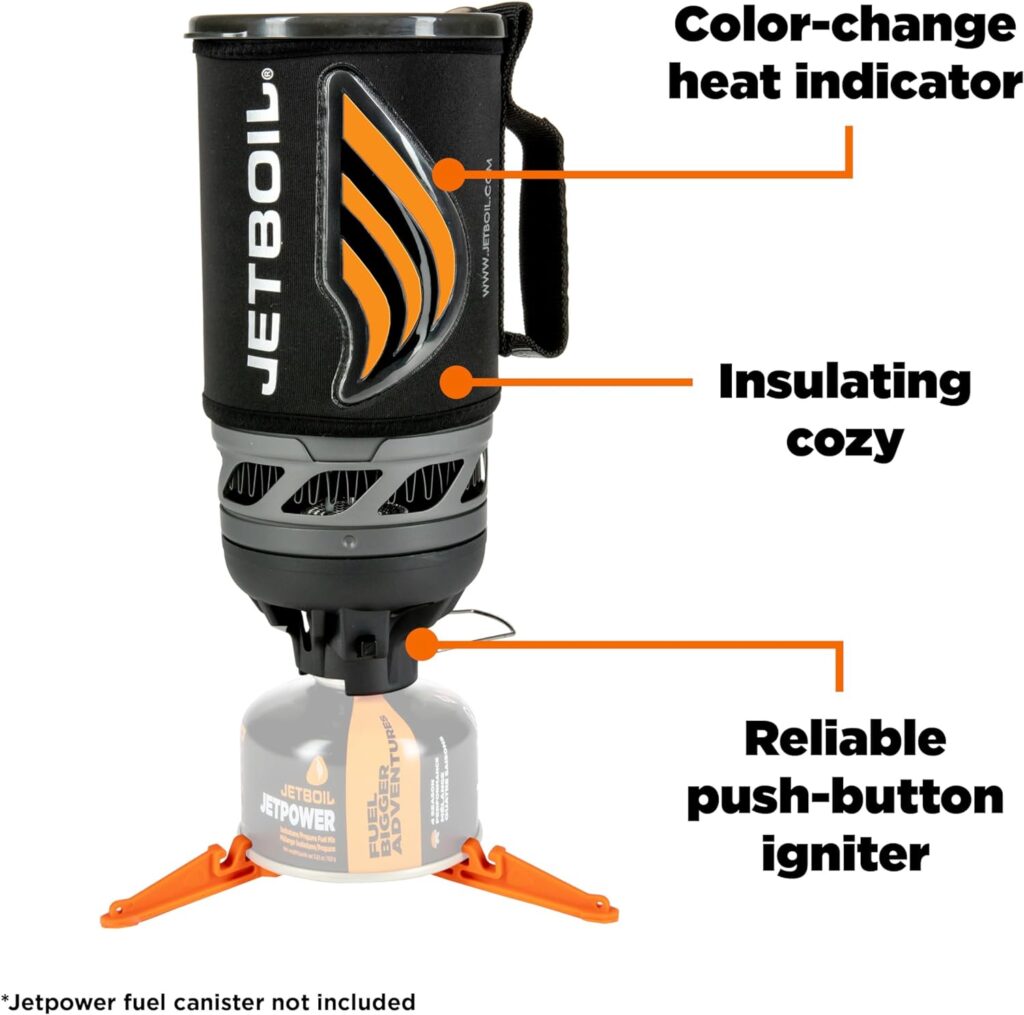
This model is a popular choice and probably the stove I see most often when operating in a field environment. It comes with a 1 Liter insulated kettle and can boil 2 cups (500 ml) of water in 2 minutes, making it the fastest way to boil water of all the stoves.
It weighs in at 14 ozs, and each canister weighs 194 grams (94 grams empty). The major concern I have with this stove is that you have to carry the canisters around with you, and they can be difficult to obtain if you are on a deployment or plan to be in the field for 6 weeks or more.
This is a great system and is recommended for shorter duration trips where it is feasible to carry the extra canisters. Each canister will burn for approximately 1 hour, allowing you to heat 2 cups of water 24 times. Click here to check the latest price on Amazon.
BioLite CampStove 2+ Wood Burning
The pocket rocket is by far the lightest of the stoves I normally see (2.6 oz), and is preferred by Soldiers who have to pack light and space comes at a premium in their packs.
The pocket rocket can fit into a pocket, and a canister of fuel can be stored in one of the sustainment pouches on the ruck and takes up the space of about two pairs of socks.
It can boil 2 cups of water in about 4.5 minutes, which is about the same as the other stoves. It can also simmer food, which if you are actually cooking something (other than just boiling water) is hard to beat.
The one weakness it has is performance under windy conditions. Some type of windscreen will be required to get the most efficiency out of it. Find a place out of the wind or you could craft a windscreen fairly easily out of heavy duty aluminum foil.
The fuel efficiency is a little less than the Jetboil Flash, one 100 gram fuel can last about 45 minutes, which should boil about 20 cups of water depending on variables. Click here to check current price on Amazon.
MSR WindBurner Personal Windproof Camping and Backpacking Stove System
The pocket rocket is by far the lightest of the stoves I normally see (2.6 oz), and is preferred by Soldiers who have to pack light and space comes at a premium in their packs.
The pocket rocket can fit into a pocket, and a canister of fuel can be stored in one of the sustainment pouches on the ruck and takes up the space of about two pairs of socks.
It can boil 2 cups of water in about 4.5 minutes, which is about the same as the other stoves. It can also simmer food, which if you are actually cooking something (other than just boiling water) is hard to beat.
The one weakness it has is performance under windy conditions. Some type of windscreen will be required to get the most efficiency out of it. Find a place out of the wind or you could craft a windscreen fairly easily out of heavy duty aluminum foil.
The fuel efficiency is a little less than the Jetboil Flash, one 100 gram fuel can last about 45 minutes, which should boil about 20 cups of water depending on variables. Click here to check current price on Amazon.
Quick Fix Food and Recipes for your Camp Stove
Instant Noodles – These are light and only require 3 minutes of cook time in boiling water.
Instant Rice – Add to boiling water, let sit for 3-5 minutes in water until water is absorbed. There are a plethora of flavors out there.
Instant Grits – Slowly pour into boiling water and stir while cooking 3-5 minutes until thick.
Instant Oatmeal – Pour into boiling water and cook for 1 minute, remove from heat and let set another 2-3 minutes.
Additives for the above – I like to add the vacuum sealed pouches of chicken or tuna to the rice and noodles for additional protein. I like to add the little can of Vienna sausages to the grits. The oatmeal I usually eat for breakfast would be the apples and cinnamon or maple and brown sugar pre-mixed packs.
There are lots of backpacking style meals that are great when heated up, but usually cost more than I am willing to spend. Brands such as Mountain House and Green belly have meals as rich as lasagna to chicken and dumplings if you are willing to spend the cash.
How to Make Coffee While Backpacking or in the Field
Here I am going to teach you step-by-step how to make coffee using the aeropress, french press, and we will even cover instant coffee.
Aeropress
Now, this little device is used by coffee aficionados around the world to brew that perfect cup of coffee. The best part is it is made of hard plastic which means it won’t get broken banging around in your ruck or pack. I personally own one of these and prefer it to the Keurig or Bunn coffee maker that now sits idly in our junk-cabinet. It somehow takes away the acidic flavor you often get with coffee and makes a really rich and smooth cup every time. Click here to check the latest price on Amazon. Now on to the instructions…
Step 1. Boil water and remove from heat for about a minute (you want the temp to be in the 200 degree range.
Step 2. Place paper filter in cap and rinse through with water for 2-3 seconds. This helps the seal to form.
Step 3. Push the plunger into the chamber and invert the AeroPress. Next, you will add a scoop of ground coffee into the chamber, and fill it half full of the hot water. Let it sit for about 45 seconds. This is called the bloom, which forces the coffee to release trapped gasses and emit that awesome aroma.
Step 4. Fill up the rest of the chamber with water and stir for about 5 seconds.
Step 5. Place the cap with the filter over the top.
Step 6. Flip the aeropress over an empty cup, and press down on the plunger, forcing the coffee to squeeze through the filter. This should take about 20 seconds to fully press the coffee out and you will hear a hiss, which means you are done. Take off the cap and you have a compacted coffee disk to discard.
Step 7. Enjoy your coffee, or if you are generous share it with your battle buddy.
The French Press
There are several reasons why a lot of people prefer french press over traditional drip brewed coffee. The first being that the french press method you are getting all of the coffee, minus the leftover grounds.
Drip brew just hits some of the grounds but not all.
French Press
This leads to a richer flavor coffee when using the french press. Also you don’t have impurities that a coffee maker may accidentally contaminate your coffee with such as calcium build-up from too much tap water, etc.
The kettles that go with both the Jetboil and Biolite have optional accessories that allow them to become a french press as well, and have heard they work well, but have never tried them. Stanley makes a great one for field use called the Cook and Brew, it is metal and plastic and will act as a kettle for the stove or fire and also a french press. Click here to check the latest price on Amazon.
Step 1. Boil water, while it is beginning to boil add coffee to french press kettle.
Step 2. Add half the water to the kettle and let sit for 4 minutes to allow it to “bloom”.
Step 3. Add remaining water and stir.
Step 4. Insert plunger, and slowly press the coffee grounds to the bottom of the kettle.
Step 5. Pour coffee into your cup, careful to keep grounds pressed down on the bottom of the kettle.
Step 6. Enjoy!
Instant Coffee
Instant coffee is real coffee beans that are roast Starbucks Vida, then ground, then the aroma and flavor is extracted via pressurized water, then freeze dried. I don’t care for the taste, but it is better than nothing. The best brand I ever had is the Starbucks VIA. They have several offerings of flavor, I like the Columbian, although normally I prefer a darker roast. Click here to check the latest price on Amazon.
Step 1. Boil water
Step 2. Stir in pre-mixed packet.
Step 3. Enjoy!
How to get a great shave in the field
For those of us whose hair is just too thick for a small electric battery powered razor, a wet shave is our only option. If you have ever had to shave with ice cold water out of the cooler or water buffalo fortunately now you can use your camp stove to heat water and actually enjoy a shave in the morning. To me, no matter how dirty I am, I feel refreshed and cleaner after a hot shave. Below is my formula for a good shave in austere environments.
Step 1. Boil water on your stove.
Step 2. Wet your bandanna or rag with the hot water and place on your face for at least one minute.
Step 3. Lather up with your preferred shaving cream (at home I like to use a brush and shaving soap, but I refuse to carry all that to the field). I typically use Gillette foaming cream, I don’t care for the gels.
Step 4. I use a 5 blade safety razor for the shave. They are a little more expensive than the single blade, but I can usually get 7 shaves from one blade. I also use a small signal mirror to see what I am doing, get the metal one so it won’t break.
Step 5. Rinse with warm water, and you are all set!
In closing, I hope I have proven to you the benefits of having a camp stove for your next field exercise, camping, or backpacking trip. One can definitely survive without it, but nothing boosts morale like a hot meal, hot coffee, or a hot shave. I think it is well worth the extra weight and space. If you have any unique tips, recipes, or food ideas please share in the comments below.